BATTLE
OF SUNDA STRAIT
28
Feb. -1 March, 1942
by Vincent P. O'Hara
TIME:
2215 February 28 - 0045 March 1
WEATHER/VISIBILITY/SEA
STATE: Clear/night, full moon 6 or 7 miles/calm
SURPRISE: Allies
MISSION: Allies to
escape to Ceylon then attack transports, Japanese to
protect transports.
The Battle of the Java Sea
marked the collapse of Allied seapower in the Dutch East Indies.
After the two Dutch cruisers were torpedoed and sunk around midnight the
American heavy cruiser Houston and the Australian
light cruiser Perth,
complying with Admiral Doorman's final order, broke off and fled east making
for Tandjungpriok, the port of Batavia. The exhausted crews remained at
battle (or action) stations all night, but contrary to expectations, the
Java Sea was clear of enemy forces at dawn. Perth, followed by Houston
(Captain Waller of the Australian cruiser being senior to Rooks, captain
of Houston) made port about noon, but when they tied up at the main
dock, the port authorities advised that only 1,000 tons of fuel oil remained
and this was being reserved for Dutch ships. After being told that
few Dutch ships remained afloat, the authorities permitted Perth to
take on 300 tons, bringing her to about
50% of capacity. They determined that Houston had enough fuel
to make Australia. The two cruisers were also short on ammunition.
Houston had about 50 rounds each for her six operative 8" guns while
Perth had only 20 rounds for each of her 6" guns. There was
no replenishment available at Tankjungpriok for this critical need.
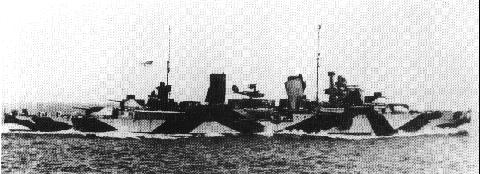 His Majesty's Australian Light Cruiser Perth. A camouflage pattern
painted upon her before he journey to ABDA.
His Majesty's Australian Light Cruiser Perth. A camouflage pattern
painted upon her before he journey to ABDA.
|
At
about 1400 Admiral Helfrich, the Dutch admiral in command of Allied naval
forces, ordered the two cruisers to proceed to Tjilatjap on the south coast
of Java along with the Dutch destroyer Evertsen. There the Admiral
unrealistically hoped to gather the remnants of the ABDA fleet (less the
Royal Navy contingent of the Western Strike Force which had been permitted
to withdraw to Columbo the day before) and continue the battle. Aerial
reconnaissance made as late as 1500 hours on the 28th indicated the western
route via the Sunda Strait was clear and that the Japanese invasion fleet
was still ten hours steaming time away. |
The Western Strike Force (light
cruises Danae, Dragon, Hobart and destroyers Scout,
Tenedos and Evertsen) had already navigated the Sunda Strait
bound for Ceylon after an unsuccessful
sweep of the waters north of Batavia on the night of February 27-28. Only
Evertsen returned to Batavia after being separated from her British
and Australian companions by a storm.
The two cruisers cast off
at 1900 on the evening of February 28. Evertsen apparently failed
to receive orders instructing her to accompany the cruisers; accordingly
she was forced to follow about an hour behind. The cruisers
cleared the channel and reached the open sea by 1930 and set course west
for the straits and, hopefully, safety.
This was a realistic expectation
but for one thing: the intelligence regarding Japanese movements received
by Waller and Rooks was faulty. The invasion fleet of 56 transports and
a powerful escort that was supposed to arrive off the Straits at approximately
0100 hours on the 1st, several hours after the Allied exit, was actually
about four hours
ahead of this schedule.
Japanese scout planes observed
the Allied cruisers throughout the day on the 28th so their presence close
to the invasion beaches should have come as no surprise; yet, the Japanese
dispositions seemed to discount the possibility of opposition.
The invasion fleet divided into three groups. Ten transports escorted
by light cruiser Yura and the 22nd DD DIV (Satsuki, Minatsuki,
Fumitsuki and Nagatsuki) sailed for Ajner Lor west of Sunda
Strait. The second group, light cruiser Sendai and the 20th DD DIV (Amagiri,
Asagiri and Yugiri) split off and made for Semarang, well
east of Batavia in central Java. The main force arrived off St. Nicolaas
Point, the extremity of Java marking the entrance to
Sunda Strait, on the evening
of the 28th. Six transports deployed at Merak on the western side
of the Point while 27 transports landed the main body of the 2nd Infantry
Division at Bantam Bay east of St. Nicolaas Point. Heavy cruisers
Mikuma and Mogami,light cruiser Natori and destroyers
Shiratsuyu, Shirakumo, Murakumo, Shirayuki,
Hatsuyuki, Asakaze
and Shikinami deployed at various points north and west of the
landing zones, up to a half hour's steaming time away. Fubuki
patrolled the eastern approaches while Harukaze and Hatakaze
remained in the bay with the transports along with the 1st minesweeper
DIV (W1, W2, W3 and W4). Further north and beyond the battle zone
the light carrier Ryujo, the seaplane carrier Chiyoda, the
heavy cruisers Kumano and Suzuya and the destroyers Isonami,
Shikinami and Uranami provided distant cover.
| At
2215 Fubuki was about 2,500 yards east of Babi Island (13 miles east and
slightly north of St. Nicolaas Point) when she sighted strange ships rounding
the island to the east. She shaped a course that took her north
of the island and then turned to follow these suspected intruders.
Conditions favored a battle.
The sea was calm, visibility good and the moon full. As the Allied
cruisers rounded Babi, Houston, the lead ship, spotted the lights
of Point St. Nicolaas marking the path to safety, and then the dark shape
of ships maneuvering dead ahead. Forewarned of the possible presence
of Dutch patrol boats, Rooks concluded they were moving too quickly to
be friendly and sounded the general alarm. Shortly after at 2244, Perth
detected Fubuki which had been following behind for almost a
half hour and challenged her by blinker. Fubuki replied with
a series of green flashes that Perth correctly interpreted as unfriendly
whereupon she opened fire. Fubuki turned, made smoke and launched
nine type 90 torpedoes from a range of 3,000 yards. The time was 2245.
The Allies realized they had unintentionally stumbled onto the main Japanese
landing and opened fire on the ships in the bay.
The rest of the Japanese
forces were scattered, mostly to the north and west. Once Fubuki
fired her torpedo salvo and withdrew north, only Harukaze and
Hatakaze were immediately available to shield the transports and
their initial activities were passive in nature. Harukaze got under
way at 2231 and covered the entrance to the bay with smoke. |
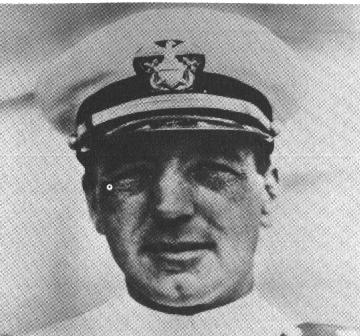 Captain Albert H. Rooks, USN, commanding officer of U.S.S. Houston.
For his valiant service at the head of his ship until he was slain at midnight
on 1st March by shrapnel, Rooks was awarded the Medal of Honor.
Captain Albert H. Rooks, USN, commanding officer of U.S.S. Houston.
For his valiant service at the head of his ship until he was slain at midnight
on 1st March by shrapnel, Rooks was awarded the Medal of Honor.
|
Hatakaze plunged into
this smoke heading north. The Allied cruisers sidestepped Fubuki's
torpedoes by making a tight full circle and resumed their course toward
the light that marked the entrance to Sunda Strait and, hopefully, escape,
shooting at targets they could only imperfectly see. At 2252
Hatakaze began to return fire.
For the first fifteen minutes
after the first torpedoes were launched, Houston and Perth were
the superior force, but at 2300 this position dramatically changed.
Shiratsuyu arrived from the northwest and engaged from a position
roughly 3,000 to 4,000 yards due north of St.Nichaalos Point. Light cruiser
Natori, with Hatsuyuki and Shirayuki opened fire from
about 5,000 yards north of the point, charging southwest and rapidly closing
range. Asakaze had been cruising north of the point.
She joined Hatakaze and Harukaze in a column about 5,000
yards northeast of the point. The heavy cruisers Mikuma, and Mogami
followed by Shikinami were still on their way, sailing south
were about 10,000 yards north and just east of the point. Finally
Shirakumo and Murakumo were steaming hard from the west,
but were still 7,000 yards west and north of the point. Houston
and Perth were about 5,000 yards directly east of the point
and only a few thousand yards northeast of the transports. They turned
south, southeast at 2300 under pressure from the increased tempo of Japanese
fire and sailed parallel to the transports for about eight minutes inflicting
some damage and remaining undamaged themselves. This condition was to rapidly
change.
At 2308 the Allied cruisers
turned northeast as they neared Penang Island. The major portion
of the Japanese light forces was heading southeast in three columns: Natori,
Hatsuyuki and Shirayuki and finally Hatakaze, Asakaze
and Harukaze. Between 2310 and 2319 they laced
the waters around the cruisers with 28 torpedoes. The Allies
replied with everything they had from 8" to .50 c machine guns and, in
the case of Perth, even four torpedoes. The nature of
the battle from both perspectives was close and confused. Gun
flashes seemed to erupt from all quarters while the waters boiled with
phosphorescent torpedo wakes. Houston suffered the first damage,
a hit on her bridge that started a
small fire. Perth
remained unscathed despite the constant illumination and heavy fire.
Finally, she took three light hits, but remained essentially undamaged.
. She returned fire with 6"guns under independent control and the
4" pumping out star shell, damaging Harukaze on her rudder and Shirayuki
on her bridge.
At 2319 the Japanese heavy
cruisers finally entered the fray sailing west well off the bay.
They fired six torpedoes each at Perth from an estimated distance of about
9,300 yards and then reversed course as they neared Babi Island.
At about the same time the Allied cruisers turned back toward the St Nicholaas
Point. They were both about out of
main battery ammunition
and, perhaps, held a final hope of forcing the straits to safety.
But this hope grew even fainter at 2322: geysers began to erupt around
Houston as the Japanese heavy cruisers opened fire from about 12,000
yards, assisted by the searchlights of their destroyers. Mikuma
had to cease fire at 2325 due to a defect in her
electric circuits, but was
able to resume several minutes later. At 2326 the battle entered
its decisive phase. Harukaze and Hatakaze fired five
and six torpedoes respectively followed at 2330 by nine each from Shirakumo
and Murakumo. Harukaze was probably the agent
of the first torpedo to hit Perth. She was making 28 knots
when it struck killing all but one of the forward engine crew. . By this
time her main batteries were reduced to firing practice shells and her
4" guns star shells. Two more torpedoes, probably from Shirakumo
and Murakumo followed at 2335. These hit the forward magazine
and aft under X turret. At this point Waller ordered abandon ship,
but a fourth torpedo found
her before she sank at 2342. Waller went down with his ship. 351
other member of the complement of 686 were lost with their captain. Another
106 crew died as prisoners of war.
While Perth was engaged
by the destroyers, Mogami fired six long lances at Houston at
2327. This was one of the most effective torpedo salvos of the entire
war. They sped pass their intended target at 48 knots directly into
Bantum Bay. At 2335 five explosions erupted almost simultaneously.
The army transports Sakura Maru (7,149 tons gross),
Horai Maru (9,162 tons)
Tatsuno Maru (6,960 tons) and the special vessel Ryujo (Shinshu)
Maru (8,160) tons all sank in shallow water, although the later
two were subsequent raised. Mogami also sank minesweeper
W2 (807 tons full load displacement) in this barrage, although her loss
is also credited to action by Houston and a mine.
Houston continued
the fight alone. Rooks gave up on the idea of escape and turned his
ship back toward the transports. At 2340 Houston suffered
her first major damage, a hit in her engine room which massacred the entire
crew. Her first torpedo hit, again from the salvo fired by
Shirakumo and Murakumo followed shortly after. Nonetheless,
she fought on. The action was so close and furious a Houston sailor
actually shot out a Japanese searchlight with a rifle. The Japanese
appeared to have some trouble separating their target from their own
ships. Houston benefited
as Japanese ships illuminated each other and their own transports and she
was able to damage three destroyers. Harukaze, Shirakumo and
Shikinami. But the end was inevitable. At 2250
she was hit on her #2 turret,
starting a fire; both magazine were flooded. Finally three torpedo
hits followed in quick succession. At 2355 Rooks ordered abandon
ship. Five minutes later a bursting shell killed the Captain.
In all Houston took 4 to 6 torpedoes, three entire salvos, eleven
individual hits and additional hits that may have been shells
or torpedoes. Every source mentions her flag was flying as
she sank, perhaps quoting an account by a crewman: " . . .a sudden breeze
picked up the Stars and Stripes still firmly two blocked on the mainmast,
and waved them in one last defiant gesture. Then with a tired shudder
she vanished beneath the Java Sea." Only 368 of her crew of 1,061
survived.
On the Japanese side Harukaze
was hit by both Houston and Perth suffering 3 KIA and
15 WIA as well as minor damage to her bridge, engine room and rudder .
Houston hit Shirakumo. Perth landed a 6" shell
on Shirayuki's bridge, inflicting 1 KIA and 11 WIA, Shikinami
had minor damage to her prop due to a near miss that reduced her speed
to 24 kts.
The Allied cruisers do not
appear to have severely punished the transports, certainly not to the extent
Mogami did, but it is hard to believe they didn't inflict some damage
during their two relatively close range passes against the anchored transports.
The Allied survivors of the battle in particular champion the point of
view that the Japanese grossly understated their damage and that as many
as 15 ships were sunk. The Ryujo Maru was the flag of the
commander in chief of the 16th Army, General Imamura. He was directing
the landing of the second wave when the explosion from the torpedo hit
threw him into the water. He was three hours struggling ashore, but
when his aide finally found him sitting on a pile of bamboo, face blacked
with oil, he congratulated the general on his successful landing.
Regardless of whether four or fourteen transports were sunk, of the disruption
and delay caused by Houston and Perth the aide's congratulations
were essentially deserved. Imamura accepted the surrender of Java
just eight days after he swam ashore. Any landing that result in
such a swift and decisive result must be considered successful.
In an aftermath to the battle
the Dutch destroyer Evertsen, originally ordered to accompany Houston
and Perth didn't clear Batavia until 2045. Well behind the Allied
cruisers (and unsuccessful in her attempts to contact them) she saw the
gun flashes from the battle and attempted to detour around it. She
made it into the strait, but, at 0130 Murakumo and
Shirakumo, vigilance no doubt enhanced by the events of the previous
few hours, caught the Dutch ship in their searchlights. They
opened fire and rapidly scored seven hits. The Dutch captain didn't
appear to fight very enthusiastically, beaching his command on Sebuku Besar.
Evertsen had only
been in commission since December, so her crew as not fully trained, for
some reason had only two of her three boilers in operation and she certainly
seemed - at best - an unlucky ship.