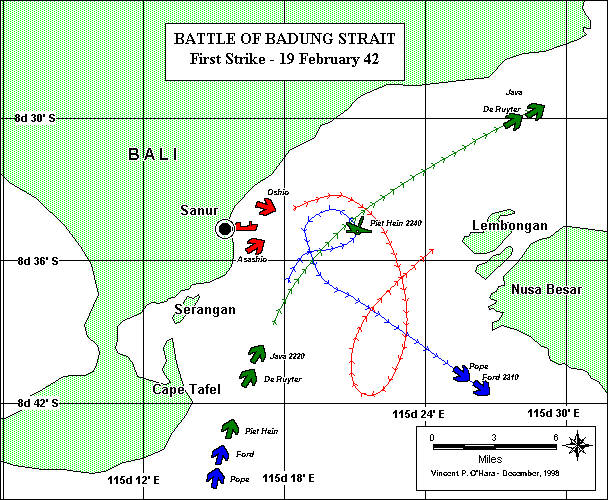
Badung Strait, Bali
TIME: 2225 2/18- 0300 2/19.
WEATHER/VISIBILITY/SEA STATE:
Cloudy, calm/Dark/calm
SURPRISE: ABDA
The success enjoyed by the Allies at the battle of Balikpapan did little to retard the relentless momentum of the Japanese offensive and was not repeated in the weeks following, despite several attempts by ABAD forces to attack Japanese invasion convoys. Kendari fell on January 24th, Ceram on January 31st, Makassar on February 8 and Banjarmasin on February 10th. The Japanese completed their occupation of Borneo and Celebes and were ready for the final stage of their offensive: the conquest of Java, jewel of the archipelago. The first step was to secure the flanks. On February 14th a force landed on Sumatra on the western flank. Bali east of Java was next on the agenda.
On February 17 a small Japanese convoy of two transports, carrying a battalion of the 48th Infantry Division, escorted by one light cruiser and eight destroyers departed Makassar bound for Bali. This battalion successfully landed early on the 18th against little resistance, although Allied B-17 strikes damaged both transports.
Dutch Admiral Karl Doorman, in tactical command of the ABDA strike force, could not ignore this landing, so close to Surabaya, his principal base. However, damage and other duties had dispersed the powerful strike force of five cruisers and ten destroyers he deployed just five nights earlier. British ships were escorting troopships in Sunda Strait, Houston was en route from Port Darwin and four American destroyers were refueling at Ratai Bay. Three destroyers were damaged and unavailable: two Barker and Bulmer by air attack on February 14th and one, RNN destroyer Van Ghent, from running aground on the same day.
As a result, Doorman devised a plan whereby those ships that could be mustered would engage in three waves, one following the next. Group 1, sailing from Tjilatjap and consisting of RNN light cruisers De Ruyter and Java, destroyer Piet Hein and USN destroyers Pope and John D. Ford, was to roar in first, inflict maximum damage with gunfire and torpedoes and retire to the north. RNN destroyer Kortenaer was also in this group, but she ran aground leaving Tjilatjap and had to drop out. Group 2, RNN light cruiser Tromp and USN destroyers Stewart, Parrott, John D. Edwards and Pillsbury, would follow from Surabaya several hours later and hopefully wreak further havoc. Group 3, nine RNN motor torpedo boats would arrive at approximately the same time and finish off any cripples (although in the event only eight participated as one hit a lightbuoy leaving harbor).
The Japanese, aware their position was exposed, hurried the landing. The last ships remaining at the anchorage at Sanur Roads off southeastern Bali, Sasago Maru with two escorts, destroyers Asashio and Oshio, were just getting underway when the first ABDA strike group arrived shortly before midnight. The second Japanese group, comprised of Sagami Maru, her engine room damaged from a B-17 strike the day before, and destroyers Arashio and Michishio had departed the anchorage shortly before. The rest of the Japanese escort force, light cruiser Nagara with destroyers Wakaba, Hatsushimo and Nenohi had already steamed too far toward Makassar to influence the action.
Forces Engaged Battle of BADUNG STRAIT
| TYPE | NAME | YEAR | DISP. FULL | MAIN | SEC | TT | SPD |
| CL | De Ruyter | 1935 | 7,548 | 7x5.9/50 | 10x40mm | - | 32 |
| CL | Java | 1921 | 7,050 | 10x5.9/50 | 8x40mm | - | 31 |
| DD | Piet Hein | 1927 | 1,640 | 4x4.7/50 | 2x3" | 6x21" | 36 |
| DD | Pope | 1920 | 1,308 | 4x4/50 | 1x3" | 12x21" | 35 |
| DD | John D Ford | 1920 | 1,308 | 4x4/50 | 1x3" | 12x21" | 35 |
| Total 1st Group: 5 1925 18,854 | |||||||
| CL | Tromp | 1937 | 4,800 | 6x5.9/50 | 8x40mm | - | 33.5 |
| DD | Stewart | 1919 | 1,308 | 4x4/50 | 1x3" | 12x21" | 35 |
| DD | Parrott | 1919 | 1,308 | 4x4/50 | 1x3" | 12x21" | 35 |
| DD | John D Edwards | 1919 | 1,308 | 4x4/50 | 1x3" | 12x21" | 35 |
| DD | Pillsbury | 1920 | 1,308 | 4x4/50 | 1x3" | 12x21" | 35 |
| Total 2nd Group: 5 1923 10,032 | |||||||
| Total Both Groups,10 1924 28,886 | |||||||
| TYPE | NAME | YEAR | DISP FL | MAIN | SEC | TT | SPD |
| DD | Asashio | 1936 | 2,450 | 6x5/50 | 2x25mm | 8x24" | 35 |
| DD | Oshio | 1937 | 2,450 | 6x5/50 | 2x25mm | 8x24" | 35 |
| Total 1st Group, 2 1937 4,900 | |||||||
| DD | Arashio | 1937 | 2,450 | 6x5/50 | 2x25mm | 8x24" | 35 |
| DD | Michishio | 1937 | 2,450 | 6x5/50 | 2x25mm | 8x24" | 35 |
| Total 2nd Group, 2 1937 4,900 | |||||||
| Total Both Groups, 4 1937 9,800 | |||||||
This threat consisted of the three destroyers: Piet Hein was 5,500 yards behind the cruisers and the American four stackers about the same distance behind her. The Dutch destroyer sailed north, northwest until confronted by the Japanese. She made smoke launched a torpedo, then opened with her guns, all this as she began turning back south. The smoke confused the Americans and blocked their visibility. Apparently the smoke was accidental: a crewmember was thrown against the MAKE SMOKE button as Piet Hein executed a sharp turn.. The American destroyers increased speed to 28 knots and broke through the smoke. At 2230 Ford spotted Sasago Maru going northwest and Oshio heading northeast following her exchange with Java. The Americans opened with their guns and believed they scored on Sasago Maru. At 2237 they both launched torpedoes at Sasago Maru and again claimed a hit. These claims are unlikely. If Sasago Maru did indeed survive a B-17 bomb, one or more 5.9 shells, 4 shells and finally a torpedo, she was a remarkably durable ship.
By this time they had closed to within 1,000 yards of Piet Hein, but the Japanese were launching torpedoes of their own. The time was approximately 2240 when Asashio hit the Dutch ship with a long lance and gunfire. She immediately sank, freeing Asashio to engage the American destroyers with both torpedoes and gunfire. The old four stackers made a loop to their port and began withdrawing southeast. Ford laid smoke to throw off Asashios aim as the Japanese fell into a parallel course to the north. The time was now approximately 2252. The two columns swapped salvos for six minutes Out of port side torpedoes, the Americans tried to bring their starboard tubes into action. This brought them across Oshio's bow under heavy fire. Pope managed to launch a salvo of five torpedoes at 2305, but all missed. Ford swung under her stern and made more smoke. By 2310 the Americans are back in column on a course of 135? with Pope leading Ford. The Japanese gunnery, while failing to damage the American ships, was accurate enough to dissuade them from following the Dutch cruisers northeast as ordered. Consequently, they retired south. The Japanese units returned to the anchorage after firing on each other for several minutes. In this exchange of friendly fire, each of the Japanese ships claimed she sank an enemy destroyer.
In the second strike the four USN destroyers led with the light cruiser Tromp following. The Japanese departure from Sanur Roads had been delayed, presumably Sasago Maru was attending to the damage she suffered during the first strike. Once again, the Allies achieved tactical surprise, but failed to cash in on their advantage. At 0136 Stewart and Parrott each fired a salvo of six torpedoes and Pillsbury three into the anchorage, but all of missed, were avoided or failed to explode. The Oshio and Asashio sortied once again. At 0143 Stewart snapped on her searchlights and commenced firing and the Oshio and Asashio replied with rapid and accurate fire. Edwards fired two more torpedoes, as ineffective as the previous fifteen, while two more stuck in their tubes. At 0146 Stewart was hit twice suffering damage to her steering engine room. Although their orders were to charge the anchorage, the aggressive Japanese response forced the Americans to turn away.
As Stewart turned northeast with the Japanese following in a parallel column, Parrott and Pillsbury almost collided. This forced Edwards to veer to starboard to avoid Parrott. Pillsbury fell out of the column and took a course south and parallel to her sisters while Parrott ended up off on her own north of Steward and Edwards. Asashio and Oshio, chasing the Allies, cut behind the wakes of Steward, Parrott and Edwards and then turned northeast, putting them between these three destroyers and Pillsbury and Tromp. The firing tapered off until the Allies turned east at about 0200. Then Asahio struck Tromp with a flurry of eleven 5 shells on her bridge and control tower, damaging the Dutch ship severely enough to force her eventual return to Australia for repairs. Her bright blue searchlight made a particularly fine point of aim. Tromp gained a small measure of revenge at 0210 with a hit on Oshios bridge that killed seven of her crew. Oshio fired a salvo of torpedoes, but all missed. Asashio took one hit that cost her a searchlight and four men killed and eleven wounded. The Japanese ships, having prevailed twice against a greatly superior enemy, circled back toward their well-protected charge. The way the night had been going, a third round probably didnt seem impossible.
By 0211 Steward and Edwards were still in column heading northeast. Parrott was hugging the shoreline heading in the same direction. At 0220 she briefly ran aground and took no further part in the action. Tromp was heading more to the east 8,000 yards off the destroyers starboard quarter. Pillsbury was also heading northeast 3,000 yards off Tromps starboard beam. At this moment the Arashio and Michishio appeared from the northeast heading southwest by south, sailing toward the sound of gunfire. They found themselves at close quarters between Edwards and Steward on their starboard beam and Tromp and Pillsbury off their port beam. At 0219 the new arrivals opened fire at Steward and Edwards, but for once, the Japanese got better then they gave. The Americans returned fire; first Pillsbury, then Edwards with particular effectiveness and finally Tromp all hit Michishio. The Japanese destroyer was severely damaged, going dead in the water with 13 killed and 83 wounded. The columns passed each other at high speeds and neither turned to continue the fight.
The third strike had no effect. The MTBs raced through in the strait in two groups of four each. The Eastern group sighted ships, but was not able to maneuver into position for an attack. The Western group saw nothing at all.
The Japanese suffered light damage to Asashio, moderate damage to Oshio (she was out for six weeks), and heavy damage to Michishio. She was towed from the scene and had to return to Japan for repairs that lasted until late October. Sasago Maru was damaged, but she was able to sail away that night. On the Allied side, Tromp was badly damaged and Piet Hein was sunk. Stewart required dry-docking in Surabaya and went on to suffer the ignominy of capture by the Japanese and service under their flag.
Given the forces deployed,
the Allies inflicted slight damage. The first strike was particularly
ineffective. The most powerful Allied units, the two light cruisers,
were only engaged for a few minutes before sailing off. Doorman undoubtedly
wanted to clear the scene so his destroyers would have a free range for
their torpedoes, but it would have been better for the destroyers to precede
the cruisers and launch their torpedoes first, as in the second strike.
The second strike did better, but only because two Japanese destroyers
sailed blindly into their midst. The ABDA forces fired several dozen torpedoes
with no result. The single ABDA loss was the result of a torpedo,
but the Japanese destroyer guns also inflicted heavy damage. Oshio and
Asashio distinguished themselves twice engaging and defeating superior
forces. Bali fell to the Japanese and the noose around Java had been
drawn tight.